Good day, dear readers, admirers and other individuals. Have you ever noticed that you are running out of space on your computer?
As a rule, this is not a consequence of a virus or your carelessness, but simply the Windows system recovery service, an incorrectly configured swap file, and others. Often the reason for a place selling is also a high browser cache value or an OS cluttered with all sorts of software garbage.
How to find out why a space disappears in Windows
As I said, there are several sources where space can go missing.
Let's look at them in order.
First, the recovery system. The fact is that Microsoft, taking care of its users, made a recovery system in Windows, which greatly influences the fact that your location disappears (although in fact it is simply “hidden”).
What it does (if you haven’t changed the settings) is that at some intervals (especially in the case of installing programs\games\) it makes restore points, which you can always use in case of a system crash/failure. The question is, are you using this recovery system?
For example, I have a hard time remembering the last time I had to do this. Moreover, the benefits of it are very doubtful. In turn, these points take up up to 12% of the space on each hard drive, which, you see, is a lot (especially on large disks). Therefore, here's how to get rid of (or at least reconfigure) the amount of space occupied by recovery points.
How to get back space on your computer disk
Start -> Settings -> Control Panel-> System -> System Restore
For Windows Vista/Windows 7/8/10:
Start -> Settings -> Control Panel-> System -> System protection
Here you can either completely disable system recovery, or distribute the points on which disks and how much space they will take up.

I cannot recommend that you completely disable recovery, because... I don’t know how often you encounter system problems and resort to recovery, but personally, I have it disabled because... I consider it a dubious tool that takes up quite a lot of space, especially since you can always use the " " article to protect and restore data.
For those who want to leave it (system restore), but configure it as competently as possible and make it so that they no longer have to look for where the space disappears:
- It is advisable that they should not be on the disk with the operating system at all or should take up as little space as possible;
- You don't need more than 3 restore points, i.e. You shouldn’t set the maximum percentage even on several disks. 3-6% on one or two disks will be enough, and then, in my opinion, this will be a lot.
By the way, before configuring these parameters, the system had already created a number of restore points, so it would be a good idea to delete them. To do this, open “My Computer”, right-click on the hard drive the place where you need to clear it and select “Properties” from the drop-down list.
In the window that appears, click on the button “Disk Cleanup” – “Advanced” – “ System Restore” – “Clear” – “Yes” – “Ok”.
Or, if you have Windows 7/Vista, you can clear the space occupied by restore points using the " button Configure - Delete", which is located on the "System Protection" tab (see path above):

This is what they call time.
Let's go to point two.
About the paging file and where space disappears
When the operating system does not have enough , it begins to unload programs into the page file, i.e. a file on the hard drive that serves as a kind of RAM, but much slower. Accordingly, the size of the paging file may vary, depending on the amount of RAM you have.
As a standard, the size of the paging file is 2-4 times larger than the amount of physical RAM, but this size can be changed, however, often to the detriment of performance (especially if there is little RAM). He also answers the question of where the place disappears, because he occupies this very place with all his strength.
Configure the location and size of the paging file on hard drives here:
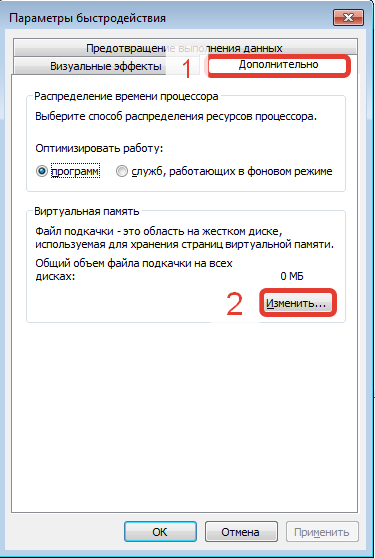
- Start -> Settings -> Control Panel-> System -> Advanced > Performance > Options > Advanced > Virtual memory -> Change
I still don’t recommend disabling the entire paging file, but redistributing or reducing it is always welcome. I wrote more about the paging file and its configuration in the article, so read it to set the correct numbers.
Cache, trash and where does the space go?
During operation of the system, programs, browsers and other things, constantly create a so-called cache, i.e. temporary auxiliary files, which (files) they periodically forget to delete. Also, after removing various programs, they usually leave behind garbage traces of files, which also sometimes weigh quite a lot.
Therefore, I recommend that you constantly clean Tempory Internet Files, browser caches, program traces and other all kinds of garbage. I wrote how to do this in the article "". I strongly recommend you read it, because it often frees up a lot of space.
Other manual cleaning
First, turn on the display of hidden files. To do this, we follow the path “ My Computer – Tools – Folder Options – View – Show hidden files and folders – OK”.
Next, open the disk with the system and find the Documents and Settings folder there. It contains your profile files and some system\program settings. The whole point is that most programs, especially if you deleted them incorrectly, i.e. Without use, let's say, they leave behind a bunch of traces and debris, which sometimes cannot be cleaned out even by Ccleaner. You have to dig with your hands. The most cluttered folders in my opinion are:
- C:\Documents and Settings\name\Application Data;
- C:\Documents and Settings\name\Local Settings\Application Data.
where C:\ is the drive where the system is located, and the name is your name in the system.
Carefully rummage through these folders and delete folders with the names of programs that have not been on your computer for a long time.
You can find the remaining thick folders yourself by selecting one\group of folders in Documents and Settings and checking their volume by clicking the right mouse button and selecting “Properties” from the list. As a rule, when traveling like this, you can find a lot of all sorts of junk that was forgotten (or deliberately left behind) by program uninstallers.
In general, to make it clearer what exactly is taking up how much space on which disk and how to delete it, I recommend reading this article of mine: “”, a program in which will clearly allow you to identify what is gnawing off treasured megabytes from the disk.
Afterword
Something like this.
I hope that the article was useful to you and that you cleared and saved heaps of valuable megabytes.
As always, I will be glad to see your additions, reviews, questions, etc., which you can safely write in the comments to this entry.
PS: As a good alternative to the above-mentioned CCleaner, I can suggest you use a wonderful program for cleaning garbage and all sorts of “forgotten” miscellaneous things.
During its operation, the operating system creates a lot of temporary data that is stored on disk (usually drive C) in the form of files and registry entries. These can be files from update packages, archivers, shadow copies, content downloaded from the Internet, etc. Third-party programs behave in a similar way, for example, browsers that store website data in a cache. Some temporary files are deleted automatically after a certain time, others remain on the disk until they are forcibly deleted.
If the user does not regularly maintain and clean up the C drive, the free space on it becomes less and less, to the point that the disk eventually ends up filled to capacity with temporary files, which precludes further writing of any data to it. reduces its performance. There are two ways out of this situation - either increase the size of the system partition at the expense of the user volume, or perform a comprehensive cleanup of it, which is more preferable. Let's see how to free up space on your local C drive in Windows 7/10.
What can you delete if the disk is full?
The system volume contains many important files that ensure the normal operation of Windows, so deep cleaning it should be approached with the utmost care. What can you delete from the C drive to free up space and not disrupt the system? All its contents can be divided into three groups. The first includes files that can be deleted without any fear. The second consists of files, the deletion of which, although it will not harm the system, can still cause certain problems under some circumstances. The third group includes files that cannot be deleted, as this can make programs and the system inoperable. You can clean up drive C without negative consequences by deleting:
- Cart Contents.
- Library catalogues.
- Folders and Downloaded Program Files in the Windows directory.
- Cache of browsers and some third-party programs.
- Icon sketches.
- Logs and memory dumps for system errors.
- Old Chkdsk utility files.
- Bug reports.
- Files created by the Windows debugger.
With some caution, you can delete shadow copies () created during the installation of updates and stored in backup copies, files from previous system installations (Windows.old folder), unnecessary components and applications, folders of uninstalled programs in the ProgramData, Program Files and Roaming directories, MSOCache Microsoft Office folder. If you do not use Quick Start, you can delete the file hiberfil.sys in the root of drive C, having previously disabled these functions in the settings. It is acceptable, but not recommended, to delete the swap file pagefile.sys. Other files and folders on drive C cannot be deleted so as not to disrupt the operation of the system.
Cleaning junk and temporary files using Windows
First, let's look at how to clear drive C of unnecessary files in Windows 7/10 using the operating system itself. Windows has a built-in utility for these purposes. cleanmgr.exe, which can be launched either through the properties of the partition being cleaned or through the “Run” dialog box. After the utility scans the disk for outdated files, check the boxes on the “Disk Cleanup” tab and click “OK.”
If you click the “Clean up system files” button, reports, device driver packages, error dumps and, additionally, restore points, with the exception of the most recent one, will become available for deletion.

For a deeper and more thorough cleaning of drive C from garbage, you can use the built-in console utilities Dism And vssadmin. The first allows you to delete temporary data from the WinSxS folder, including backups created before installing Windows updates. To do this, use the following commands executed in the CMD console running as administrator:
- DISM.exe /online /Cleanup-Image /StartComponentCleanup
- DISM.exe /online /Cleanup-Image /SPSuperseded
- vssadmin delete shadows /all /quiet
The first command does the same thing as the cleanmgr.exe utility, only more thoroughly.

The second deletes all backup update packages from the WinSxS folder.

The third command can delete all restore points, including the last one.

However, you should use these tools with caution, since after executing the indicated commands, you will no longer be able to roll back the system to a working state or a previous version.
Note: Before cleaning the WinSxS folder, it is recommended to set its true size, thereby making sure that it really needs cleaning. To do this, you need to run the command on the command line Dism.exe /Online /Cleanup-Image /AnalyzeComponentStore and compare the actual size of the component store with the size indicator in the Explorer properties.

After updating Windows to a newer version, a folder appears in the root of drive C Windows.old, which can take up significant disk space.

The contents of this directory are copies of the system installation files of the previous version of Windows. If you are determined not to return to the old version of the system, the Windows.old folder can be deleted. This is done again either using cleanmgr.exe or using the command line. In the first case, you need to find and select the “Previous Windows installations” item on the “Advanced” tab; in the second case, run the command in the CMD console running as administrator rd /s /q c:/windows.old.

You can get a little extra space on the C drive by removing unused components, the same ones that are accessible through the classic Add/Remove Programs applet.

The standard Dism utility is also used here. To select and uninstall an unused Windows component, run the following two commands in the CMD console running with elevated rights:
- DISM.exe /Online /English /Get-Features /Format:Table
- DISM.exe /Online /Disable-Feature /featurename:NAME /Remove
The first command displays a list of all components in the system, the second deletes the selected element. In this example, its name must be substituted for the NAME line element.


Manual removal of programs and files
With the exception of Windows 8.1 and 10 universal apps, almost all desktop programs are installed in the folder Program Files. If a program is no longer needed, it should be deleted so that it does not take up disk space, but this must be done either using a standard uninstaller or using special third-party programs. However, after uninstalling applications, folders with configuration files may remain on the disk, the weight of which can reach several hundred megabytes. Such data must be deleted manually.
Let's say you have removed Microsoft Office or Skype from your computer and you also want to get rid of all their remaining “tails” on the C drive. To do this, carefully check the Program Files and ProgramData directories in the root of drive C, as well as the folders C:/Users/Username/AppData. If the folder name matches the name of the deleted application, it can be deleted.

The AppData folder is a little more complicated. This hidden directory contains three subfolders: Local, LocalLow and Roaming. The first stores files created during the operation of various programs. You cannot clear it entirely, as this will most likely lead to the loss of saved application settings, however, half-empty folders of uninstalled programs can be completely safely deleted. You can also safely clear the contents of the folder located in it Temp.


The same applies to the LocalLow and Roaming folders; it is permissible to delete from them only those directories that belonged to previously uninstalled applications.

Note: By clearing the contents of the Local, LocalLow and Roaming folders, you lose user settings and data saved in their cache. For example, after deleting its folders in your user profile, you will lose your current messenger settings and part of your message history.
As for removing universal applications, they are uninstalled using the standard tools of the system itself or the CCleaner program, which will be discussed below. You can also move some universal applications from drive C to drive D, if they support this feature.

Transferring desktop programs to another volume is also possible; there is a special utility for this purpose SteamMover, which you can download from the developer’s website www.traynier.com/software/steammover.
Using CCleaner
Many novice users are interested in how to delete unnecessary files from drive C using third-party programs, as well as which of these programs are more effective and safe in this regard. These can be recommended CCleaner– a simple, fast, convenient, and most importantly safe Windows disk and registry cleaner. This program allows you to delete temporary data from the Internet and Windows itself, the contents of the thumbnail cache and DNS, Index.dat files, memory dumps, fragments of chkdsk files, various system logs, outdated prefetch files and a lot of other unimportant data.

Using CCleaner, you can clear the system registry of incorrect entries, optimize, enable, disable or remove browser extensions, analyze the contents of hard drives, search for duplicates and, of course, uninstall unnecessary applications, including universal ones.


CCleaner's interface is very simple, so understanding its simple functionality will not be difficult even for a novice user.
Considering, however, that the main purpose of CCleaner is still cleaning, all its additional tools have limited functionality. If your C drive is full of unknown things, and you want to find out what exactly it is, then for these purposes it is better to use specific utilities, for example, Scanner, JdiskReport or their analogues, showing more accurate information about the file structure of the media with the ability to navigate through subdirectories.

Other ways to free up space on drive C
Clearing the Driver Store
The steps described above are usually enough to free up enough space on the system volume, but what if drive C is still full? What else can you do to get additional space? One option is to clear the contents of the folder FileRepository located at C:/Windows/System32/DriverStore.

This directory contains copies of device drivers that were ever connected to the computer, and may also contain outdated versions of drivers. Before deleting driver packages from the FileRepository folder, it is highly advisable to create a complete list of them and find only outdated versions in it, leaving the rest untouched. It also wouldn't hurt to create a complete copy of all drivers installed on the system. To list the DriverStore drivers in a file, run the following command in an elevated command prompt:
pnputil.exe /e > C:/drivers.log

Compare the driver versions in the list and remove only the outdated ones.

To remove the selected driver, immediately run the command in the console pnputil.exe /d oem№.inf, where № is the name of the driver in the list.

If an error appears in the console when uninstalling a driver, it means the driver is being used by the system. There is no need to touch such a component.
As an alternative to the command line, you can use the free utility Driver Store Explorer, just designed to remove old unused device drivers.

Disabling hibernation
Thanks to the hibernation mode, the user can quickly return to work in running applications; on the other hand, its use requires the allocation of significant space on the system disk, slightly less than or equal to the amount of RAM. If having free space on your hard drive is a priority for you, you can disable hibernation mode by deleting the hiberfil.sys container file.

Launch the CMD console as an administrator and run the command in it powercfg -h off. Hibernation will be disabled and the bulky hiberfil.sys file will be removed.
Note: The hibernation file can be compressed by a maximum of two times with the command powercfg hibernate size 50.
Disabling the page file
In addition to other hidden system objects, there is also a file in the root of drive C that can be deleted under certain conditions. This is the swap file pagefile.sys. This file plays the role of a RAM buffer, and if an application does not have enough RAM to operate, its data is temporarily written to . Accordingly, if there is no swap file, a heavy application will slow down greatly or simply freeze while waiting for faster RAM to become available. Therefore, disabling and deleting the paging file is not recommended unless the computer has a very large amount of RAM.
If your PC has more than 10 GB of memory or you do not intend to run resource-intensive applications, you can try carefully disabling swap. To do this, open Advanced system settings and on the “Advanced” tab in the “Performance” block, click the “Options” button.

This will open another window. Switch to the “Advanced” tab, and then click the Change button in the “Virtual Memory” block.

Uncheck the “Automatically select paging file size” checkbox, turn on the “No paging file” radio button, save the settings and reboot. The pagefile.sys file will be deleted.

Removing the MSOcache folder
Users who have installed Microsoft Office have a hidden folder in the root of the system volume MSOcache, the weight of which can reach several gigabytes.

This folder is an office suite cache and contains files that may be needed to restore Microsoft Office if it becomes corrupted. The MSOcache folder is not involved in launching Microsoft Office or working with documents, so it can be deleted in the standard way. Just keep in mind that if Microsoft Office is damaged for some reason, you will have to restore the package from the installation disk with its distribution.
Compressing the contents of a system volume
You can free up some free space on drive C without deleting anything from it at all. Instead, all system files can be compressed. To do this, just open the properties of drive C, on the “General” tab, check the box “Shrink this drive to save space” and click “OK”.

To compress system files in Windows 10, you can use the function Compact OS by running one of two commands in the CMD console running as administrator:
- compact /CompactOs:query
- compact /CompactOs:always

The second command performs the same actions as the first, but in forced mode. It is used if you really want to shrink the system volume, and the first command rejects the operation, considering it inappropriate. Compression is completely reversible and to return the file system to its normal state, just execute the reverse command compact /CompactOs:never.
In addition to NTFS compression, LZX compression is available in Windows 10, but it has a number of disadvantages, which is why it is not widely used. LZX compression is applicable to read-only files and directories, but an entire system volume cannot be compressed with its help due to the risk of an unbootable system.
Nowadays, one of the most valuable resources is memory. It stores files and programs necessary for work, leisure and entertainment. In computers, storage media are hard drives and their more modern analogues, solid-state drives. The classic option for allocating space on any computer is to allocate space for the operating system, where all programs are also installed, and to create partitions for storing photos, music, films and countless documents valuable to the user.
In the process of using a computer, a large number of different files are created on the system partition, which are necessary for the normal operating state of the operating system and its components. Many of them have an expiration date, which, upon expiration, makes previously created files completely useless. They take up valuable space, gradually filling up free space on the system partition, causing chaos in the file system.
The issue of saving space in partitions by destroying unnecessary data is quite relevant at the moment, so there are special utilities that can be finely tuned for maximum efficiency. Disk cleanup can also be performed using internal operating system tools, but first things first.
Method 1: CCleaner
There is probably no user who has not heard about this program. CCleaner is rightfully considered one of the simplest, but at the same time functional utilities for searching and removing temporary and irrelevant files from the system. There are a number of detailed settings that will help you customize this product completely to the user’s requirements, performing all the necessary operations.
- The program has a paid and free version. The latter is suitable for us; it has all the necessary functionality and is not limited in time of use. You need to download the installation file from the developer’s official website, double-click it and install it on the system, following the installer’s instructions.
- Open the program using the desktop shortcut. For convenience, install the Russian language by following the instructions in the screenshot below.
- Now go to the first tab of the program. On the left side of CCleaner, in both tabs, you need to configure the items that need to be removed during cleaning. The program has a competent Russian translation, even an inexperienced user will immediately understand what needs to be cleared. By default, certain data is selected for deletion, which means you can start cleaning right away. But it is recommended to carefully study each proposed option to free up space as efficiently as possible.
After the settings have been completed, you can click on the button "Analysis", the program will scan the data specified to it and show the exact size of the files that it will delete. Don't be surprised if their size exceeds several gigabytes.
- CCleaner has a built-in tool to fix errors in the system registry. At best, this will remove several kilobytes of unnecessary information, but will correct incorrect file associations, errors in startup and libraries, and check the functionality of services in the operating system. To search for errors in the registry, go to the second tab in the left panel of the program and at the bottom of the window, run the scan by clicking the button "Search for problems".

The program will check, it may take some time. After completion, the user will be presented with a list of problems found in the system. You can fix them using the button "Fix selected Issues".

You will be prompted to create a backup copy of the registry in case problems arise after the update. We confirm saving the copy.

Select a location to save the file. Its name will contain the date and exact time the backup was created.

After creating a backup, you can fix the problems found with one button.

The correction will also take some time, depending on the number of records found. We recommend that you restart your computer after the fix is complete.
- A large number of rarely used programs may be installed on the system. Removing them will significantly increase the amount of free space on the system disk, speed up the computer boot time and reduce the load on the OS.
In the left menu, go to the tab "Service". A little to the right of this menu will appear a list of tools that will be useful to us in the future. The first tool on the list will be "Remove programs"- a fairly accurate copy of a standard utility in the Windows environment, which will display a list of programs and components installed on the system. Find the software that you do not need on your computer, right-click on its name and select "Uninstallation", then follow the instructions of the standard uninstall program. Repeat this step for each unnecessary program.

After removing all unnecessary programs, it is advisable to carry out the cleaning described in point 3.
- Surely your browser has a large number of add-ons and plugins installed that you very rarely use. Not only do they take up space on the system disk, but they also significantly slow down the browser itself. Immediately carry out general cleaning using a tool "Browser Add-ons", which is located just below the previous one. If several browsers are installed on the system, you can navigate between the list of their add-ons in horizontal tabs.
- To more clearly study the list of files that take up space on the system partition, you can use the utility "Disk Analysis". It allows you to use checkboxes to indicate the types of files that we need to find on the disk.

The scanning will take some time, after which the results will be displayed in the form of a simple diagram. In the list of categories you can view the percentage of available files, their total volume and number. When you select a specific category, just below you will see a list of these files in decreasing order of size - an ideal way to identify the scoundrels who are stealing free space from the user. Before analyzing the disks, it is strongly recommended that you clean up temporary files, which was described in point 3 - the program finds a huge number of files that are currently located in temporary folders and will soon be deleted. The information is correct, but useless.

- Once the cleaning is complete, all temporary files of the operating system and programs installed on the computer will be deleted. They take up most of the space, but with CCleaner you can free up even more space by removing duplicate files. Identical files may appear if, instead of moving from one directory to another, the files were copied. It is useless to keep two copies of the same data, but they can take up a lot of space.
Here you will have to be careful. If identical files are found in the directory of a program, then it is better to refrain from deleting it so as not to disrupt the functionality of the latter. Select files that can definitely be deleted one by one with the left mouse button, clicking on the empty checkmarks to the left of the names, then in the lower right part of the program window, click the button "Remove selected". Be careful - this action is irreversible.
- Forgotten and irrelevant recovery points can take up a lot of space - the size can be literally tens of gigabytes (if you don’t know what recovery points are and why they are needed, we recommend reading). Using a tool "System Restore" review the list of restore points. Delete the unnecessary ones, leave 1-2, just in case. To delete, select unnecessary ones, then click on the button below "Delete".


Method 2: Manually removing unnecessary files
You can free the system partition without third-party utilities. This method has both advantages and disadvantages; the details will be discussed below.
- A huge number of users store collections of music, movies and photos directly on the system partition. It is strictly not recommended to do this, because... If the operating system malfunctions, precious collections are at risk. Move them to an adjacent partition; if there is none, split the hard drive into partitions of the required partition (check out this material).
Right-click on the folder in which the large files are located, in the context menu that opens, select "Cut out".

Then open another section, right-click on an empty space, select from the context menu "Insert".

Moving multimedia files will significantly relieve the load on the system partition.
- How long has it been since you cleaned "Basket"? These files do not hang in the air, but lie on the same system partition, just in a different folder. Final cleaning of deleted files can suddenly add a gigabyte or two of free space.
Right-click on the Recycle Bin icon on your desktop and click on "Empty trash".
In our age - the age of huge hard drives with a capacity of 1-1.5-2 terabytes, despite the huge disk spaces, some problems remain the same. The space on the system disk was running out as before, and now little has changed.
There are a huge number of specialized programs designed to help the user in this seemingly difficult task, but most of them are paid. In this article we will look at methods for freeing up disk space manually and using free programs and utilities.
Next I will tell you how you can urgently free up space on the system (and not only) disk in the shortest possible time, but first you need to familiarize yourself with the basic methods of disk cleaning WITH:(What is the C: drive?).
Where does the free space on the C: drive go?
In addition to the fact that disk space runs out due to the efforts of the user himself, who actively uses his data storage, and through the efforts of various programs and the operating system itself.
In the first case, these are numerous films and music stored on the desktop (after all, we are talking about the system disk C:, and not about others, and by default, all the contents of the desktop are stored on the system disk). If you have several disks, whether physical or logical, then you can copy the entire contents of your desktop to one of these disks, depending on which has more space. If you only have a disk C:, then, unfortunately, this is not available to you.
In the second case, these are temporary files of programs that create these same temporary files to store some data that is required while the program is running until it is closed. When closing a program, these same files should be deleted, but this does not always happen, and they tend to accumulate ad infinitum. Temporary Internet files, if you use the Internet Explorer browser, also tend to be collected. Of course, to free up disk space, you can delete unused programs and games, but today we will look at how to do without sacrifices, namely...
How to free up space on the C: drive without deleting the programs there?
First, let's do a little preparation, which we will need to more successfully and efficiently get rid of temporary files. For the purity of the experiment, we will measure how much space was on the hard drive of the author of this article and will monitor these values after each stage of disk cleaning.
1. Go to the folder My computer and select the menu there Tools>Folder Options.

2. Go to the tab View and in the window Extra options select Show hidden files and folders. We will need this to clear temporary files from our profile. By default, these things are hidden from users, but we are not happy with this state of affairs. Click OK to save settings. For Windows Vista/7 users - to get to this window, you need to go to Start>Control Panel, select in the column View Small icons and double click on the icon Folders settings.

3. Now press Start, find the Run command there (in Windows Vista/7 they are not displayed by default - see) and type (or copy from here) the command %USERPROFILE% and press the button OK. In the window that opens, go to the folder Local Settings > Temp(Windows Vista/7/8 owners - you need to go to AppData > Local > Temp).

4. Click Ctrl+A and after that the key combination Shift+Delete(deleting files bypassing the trash can) and click Yes.

All these files can be safely deleted, because... Since they ended up in this folder, they cannot represent any value. However, during the removal process the following situation will definitely arise:

Here we answer Yes for everyone
And then this:

Here we press OK, after which we press the key Ctrl and left-click on the file with the name indicated on the message to deselect it. After that again Shift+Delete and moved on until everything that could possibly be removed was removed.

Why did this situation arise? The fact is that we are deleting files from the current profile, so there are files there that are currently used by the operating system and programs. Naturally, Windows will not allow you to delete them, so as not to cause a system crash. Everything else must be removed.
This is what the folder looks like Temp after global cleanup:

Here's how much disk space is freed up WITH:

This computer undergoes such cleaning regularly, so in your case the results may be much more noticeable. The author once freed in this way 20(!) Gigabytes disk space and this is only by deleting the contents of the Temp folder. True, it was someone else's computer.
Let's move on to the next stage. Let's go to the folder My computer, disk WITH:, folder Windows and there is a folder in it Temp. If during this long journey the message appears:

Choose with confidence Show the contents of this folder and move on.

In fact, this folder Temp left as part of the operating system only for compatibility with older programs, so it will most likely be practically empty. But the chicken pecks every grain, so we will clean everything we can, and the result will be good. We do exactly the same thing with this folder as with the previous one of the same name. Namely Ctrl+A And Shift+Delete.
In this case, about three megabytes were freed up, so there is no point in looking at how the disk space of the tested disk has changed.
Cleaning temporary Internet files. This method works if you are using Internet Explorer. Although, in other browsers everything is deleted in much the same way. Let's go to Start>(Settings>)Control Panel and double-click on the icon Internet Options.

Press the button Delete.

Check the boxes like this and click Delete. And than OK after removal is complete. Let's see how the free disk space indicators have changed:

On this computer, Internet Explorer is almost not used, so in your case the effect may be much more noticeable.
Now right click on Cart and choose Empty trash. This is done just in case something might fly into the trash can. You don't store it in Cart the most necessary files, right? Just like don't store food in the trash can.
Next we will use the program DupKiller- this program will help us get rid of duplicates. The program is absolutely free. You can download it either from our website (Download DupKiller), or the latest version from the website of the manufacturer DupKiller. There is a suspicion that in the near future it will become a full-fledged paid commercial product, but so far this has not happened (the program is in the beta) - we use it!
Moving virtual memory from system drive C: to another drive
This method is suitable for those who have on their computer in addition to the system drive C: there are other logical drives, for example, D:, E: and so on. Naturally, we are talking exclusively about hard drives, both physical and logical. Card readers, DVD drives, flash drives and other benefits of civilization, naturally, will not work. And the space on these disks should be at least 5-6GB.
To do this, in any version of Windows, you need to go to the Control Panel and open System properties. This is done as follows:
Let's go to Start and choose Control Panel(a small clarification for the lucky owners of computers running Windows 8 - to enter the control panel you need to place the mouse cursor in the upper or lower right corner of the screen, select Settings And Control Panel).

In the window that opens, select Small icons or Large icons(1), depending on your visual acuity and double-click on the icon System(2).

In the window that opens, click Additional system parameters.

In the window that appears, click the button Options.

Select a tab Additionally and press the button Change.
In the next window you will need to do exactly the following things:
Uncheck the item Automatically select paging file size(1), select disk C:(2), put a radio button No swap file(3), be sure to press the button Set(4). At the same time, Windows will definitely swear at our actions and say that this is not good. But we are not afraid of difficulties and continue our sorrowful work and transfer virtual memory to disk D:(or any other one you have - whichever has more space).

Basically, if you have 16 gigabytes of RAM or more, then you can skip the next step, click OK, agree with everything and restart the computer - this will also give an increase in performance. If it is less than 8 GB, then it is better not to experiment and move on to the next step.
Now we need to place the page file on disk D: or any other of your choice. I have only C: And D:, so let's look at this example. Select the disk D:(1), then select System Size(2), press Set(3) and a button OK.

Now we press everywhere OK and answer the question about restarting the computer Yes. If Windows for some reason does not ask you to restart your computer, you should still do so for the changes you made to take effect.
Installing the DupKiller program

Select the installation language.


We accept the terms License Agreement.

You can’t really change anything here, so click Further.


Installation progress window.

Click Ready.

Now we need to go to Start>(All) Programs>DupKiller>DupKiller. At startup the advice appears. If necessary, uncheck the box Show tips on startup. Click Close.

This is what the main program window looks like. All you have to do is select the disk C:- I don’t have any duplicates on it, so for greater clarity I selected all the disks. I definitely have duplicates there, because... I duplicate especially important information on different disks (I physically have 3 of them).

Menu files and folders - select All files.

Menu Exceptions. You can leave it as is so that you understand the principle by which the program makes the selection. After analyzing the selection results, it is possible to add exceptions and scan the disk again.

Menu Search settings- we leave everything as it is.

Menu Other settings- we leave everything as it is.

Menu Removal- you can leave everything as is, you can select Delete files immediately if you are not afraid of accidentally deleting something important. For the first time it is better to leave the option with Basket.


Press the button Scan and we wait...

This is how much space is taken up by duplicates on all drives.

And now the routine begins - we put checkboxes on the files that we definitely do not need as duplicates. Keep in mind that the checkbox needs to be checked only for one copy of the duplicate, otherwise there is a high probability that both the original file and its duplicate will be deleted. There is no doubt that in this case even more space will be freed up (smile), but we agreed to do without sacrifices.
I would like to draw your attention to another point that will make your life much easier - if you see duplicate folders in the dupekiller’s list, then this routine can be simplified - go through Explorer to the desired folder and delete it manually. It will be much faster than checking thousands of boxes.
Warning for Windows Vista/7/8 users:
While the DupKiller program is running, you can see the following picture:

Remember - files located on such paths are not duplicates. These are the so-called symbolic links, i.e. the file is physically located alone on the disk, and a link to it can lead from different places. Remember this! For simplicity, you can focus on this - if a folder appears in one of the three paths ProgramData- this suggests that everything else is links.
Well, the last stage in our epic - disk defragmentation. The defragmentation program optimizes the location of files on the disk (after our actions there is something to work on, take my word for it) and compresses files that have not been used for a long time, which also frees up additional disk space.
To launch it, you need to right-click on the disk WITH:, go to the tab Service and press the button Run defragmentation.

In the window that opens, click - Defragmentation and we go to smoke, eat, buy bread, etc., since this process is quite long. It is recommended to do this once every 3-6 months, depending on how actively the computer is used.
In principle, during defragmentation, you can even try to do something, however, the computer will work very, very slowly.
An emergency way to clean up (free up space) drive C:
As I promised at the beginning of the article, I present a method for emergency release of disk space from the discharge "when it's really stuck".
You can buy a new hard drive (or an external one) and dump some of the information onto it, but you don’t always have the time, opportunity, or money for this.
In this case it comes to the rescue Disk compression. If you go to My computer, right click on the drive WITH:(and for any other purpose, except a flash drive and a floppy drive) and select Properties, then you will see a checkbox Shrink disk to save space. After inserting it and clicking on the OK button or Apply a window will appear:

Here you need to select To C:\ and all subfolders and files and press OK. The procedure will take from 10 minutes to half an hour and will free up a certain amount of disk space.
On the other side of the coin in this case, you will notice that the speed of the computer has decreased. This happens because on a compressed disk, when opening a file, the operating system must unpack it, and then perform certain actions. This very “unpacking” takes up processor performance and machine time. Therefore, even if you had to shrink the system disk, try to find an opportunity to expand it back as quickly as possible in order to return the computer to its previous performance.
Owners of computers with Windows Vista/7/8.
The location of data in user profile folders on computers with Windows Vista/7/8 operating systems installed differs from those in Windows XP. Here we will briefly look at the main differences:
Folder Documents and Settings is now called a folder Users;
- Folder Local Settings is now in the folder AppData and is called Local- there you can find a thick folder Temp and clean.
I also recommend using a program called CCleaner. The program is good, the only thing it can’t do is clean the profiles of other users on the computer. Those. It will delete all temporary files accumulated in the folders of the active profile, and all the rest either manually or under each one, go in and launch CCleaner.
In this article, we will look at various ways to clean up the disk and free up space on it in any operating system Windows XP, 7, 8.1, 10.
1. Where does disk space go?
During the process of computer operation, system updates, installation of programs, visiting websites and other actions, many unnecessary files accumulate on the disk, which are often called garbage or junk. In addition, we often download some files ourselves, and then, when they are no longer needed, we forget about them.
Extra files not only take up disk space, but also reduce system performance. The disk takes longer to find the necessary files, and some of them may take up space in RAM and use processor resources. In addition, viruses often like to live in temporary files.
For stable, fast and reliable operation of your computer, you must keep the disk clean and tidy. Nowadays, the problem of lack of space on SSD drives, the volume of which is very limited, is also relevant.
In this article we will try to comprehensively solve the problem of lack of disk space. To achieve good results, we recommend that you read the entire article and follow all the tips in the order in which they are presented.
2. Removing unnecessary programs and games
First of all, remove all programs and games that you no longer need. This will not only free up disk space, but will also speed up the system.
Press the “Win+R” key combination, enter “appwiz.cpl” and press “Enter” or use the “Uninstall programs” shortcut from the “ ” section.
In the window that opens, carefully review the list of installed programs and games and remove all that you are unlikely to use in the near future.

To remove a program, right-click on it and select “Delete”.
Do not delete anything whose purpose you do not understand or if you are not sure.
After that, manually find and delete the save folders of the deleted games, as they can take up a lot of space. You can easily find out where the saves of a particular game are by searching on the Internet.
Many online games also retain their distributions (installation packages) during updates, which are no longer needed, but at the same time take up a lot of space. For example, the Mail.Ru game center saves distributions in the “Distrib” folder, and the “World of Tanks” game – in the “Updates” subfolder. Files in such folders can occupy tens of gigabytes and can be safely deleted.
3. Find and delete unnecessary files
It often happens that some old unnecessary files take up a lot of disk space, but we forgot about them and don’t know where they are. In order to find them, I recommend using the “TreeSize Free” utility, which you can download in the “” section.
After launch, the program will scan your disk, determine the sizes of files and folders and sort them by size.

This way you can easily determine which folder contains the files that take up the most space. Delete any files you no longer need. If you think you might still need some of them, burn them to disk. Selecting the disk to scan (C, D, etc.) is done in the “Scan” menu.
4. Transferring user files and folders
If you have a second disk or partition (for example, disk “D”), then first of all transfer to it all files from the desktop and user folders such as “My Documents”, “My Music”, “My Videos”, etc. ., since they are all physically located on the “C” drive.
You can move files manually by creating folders for them on another drive or partition in advance. But it is more correct to change the location of the user’s folders using the operating system. Then all new files that you or any programs save on the desktop and in user folders will automatically end up on another disk partition, without causing the system partition to overflow.
4.1. Transfer user folders to Windows 7, 8.1, 10
Go to the folder “C:\Users\Name”.

Right-click on the “My Documents” folder and go to the “Location” tab.

Replace the drive letter with the one where you want to move the folder (for example, "D") and click OK.

Agree to move the files, and then repeat all the steps for the Desktop folder and other user folders.
4.2. Transfer user folders to Windows XP
In Windows XP there is no function for automatically moving user folders and we will use a special utility “XP Tweaker”, which you can download in the “” section.
Install the utility and run it. Then in the left pane, select the “Windows XP” section and go to the “System Folders” tab.

Select the "My Documents" folder with the mouse, change the drive letter to the one where you want to move the folder (for example, "D") and click the "Change" button.

Follow the same steps for the “My Pictures”, “My Music”, “Desktop” folders.
After that, go to the folder “C:\Documents and Settings\Name”.

And manually move the “My Documents” and “Desktop” folders to the new location “D:\Documents and Settings\Name”.

5. Disk cleanup using Windows
All versions of Windows have a Disk Cleanup feature. Using it, you can clean up any partition of the disk (C, D, etc.), but it is most effective for cleaning the system partition (drive “C”), since this is where most temporary files are stored.
Right-click on drive “C” and select “Properties”.

Click the Disk Cleanup button.

Click the "Clean up system files" button (Windows 7, 8.1, 10).

Check all the boxes and you will see how much space will be freed up when deleting temporary files.
![]()
The volume of temporary files can reach 5-10 GB. Click the "OK" button and all temporary files will be deleted.
6. Deleting the hibernation file
The hibernation file (hiberfil.sys), which can be close in size to the amount of RAM, is located on the “C” drive and is used for sleep mode. If you do not use this mode, but turn your computer on and off in the usual way every time, then this file can be safely deleted, since it takes up a lot of space.
The system will not allow you to manually delete this file, and even if you do this using a special utility for deleting files, the system will create it again. Therefore, to correctly delete the hibernation file, you need to disable sleep mode.
Launch Command Prompt as administrator and run the following command:
Powercfg -h off
After this, the system itself will delete this file and will no longer create it.
If you don’t know how to work with the command line or don’t want to bother, you can download the “Deleting a hibernation file” command file in the “” section.
All you have to do is right-click on it and run it as Administrator (except for Windows XP).

7. Disable or change the page file size
The paging file (pagefile.sys), which can be one and a half times the size of RAM, is located on drive “C” and is used by many programs to compensate for the lack of RAM.
If you have a fairly large amount of RAM and a small “C” drive (for example, an SSD), many enthusiasts advise disabling the page file.
In the window that opens, go to the “Advanced” tab and in the “Performance” section, click the “Options” button.

In Performance Options, go to the Advanced tab and click the Change button.

Uncheck “Automatically select paging file size”, check the “No paging file” checkbox and click “OK”.

After restarting the computer, the paging file will be deleted and a lot of space will be freed up on the C drive.
But keep in mind that the system’s operation is tightly tied to the page file, and some programs may not even have enough 8 GB of RAM. Therefore, out of memory errors may begin to appear.

You can try completely disabling the paging file if you have 16 GB or more of RAM, but I still would not recommend doing this.
Hard drive A-Data Ultimate SU650 120GB8. Disabling System Restore
The recovery service makes backup copies of system files and stores them in a special hidden folder, which can take up a lot of disk space. At the same time, the built-in recovery tool does not always work correctly, and viruses like to hide in the backup folder.
Press the “Win+R” key combination, enter “sysdm.cpl” and press “Enter” or use the “System Properties” shortcut from the “ ” section.
In the window that opens, go to the “System Protection” tab, select the “C” drive and click the “Configure” button.

Check the “Disable system protection” checkbox and click “OK”.

After this, all backup copies of system files will be deleted and additional disk space will be freed up. This way you can free up 5-10 GB of valuable space on drive “C”.
9. Disabling the Recycle Bin
You can disable the Recycle Bin on drive “C” so that it does not take up space on it. To do this, right-click on the trash can icon and select “Properties”.

Set the “C” drive to “Destroy files immediately after deletion” and click “OK.”
After this, if you delete large files from folders with game distributions or any other, they will not end up in the trash and will not take up space on the “C” drive.
10. Cleaning up your backup storage
To clear the system file backup storage in Windows 8, 8.1, 10, I recommend running the following command at the command line as Administrator.
Dism.exe /Online /Cleanup-Image /StartComponentCleanup
For this purpose, you can also download the “Cleaning backup storage” command file in the “” section and execute it as Administrator.
11. Deleting temporary folders
You can painlessly delete temporary folders left after installing some drivers and programs:
C:\AMD C:\ATI C:\CONFIG.MSI C:\Intel C:\MSOCache C:\NVIDIA C:\SWSetup
12. Automatic disk cleaning and acceleration
There are special utilities to automatically clean the disk from temporary files. One of the best that I recommend is .
It can be set to clear temporary files every time you boot your computer, which will help maintain free space on your C drive and also give you a little extra protection since temporary folders are a favorite place for viruses.
But you need to configure it correctly, otherwise this utility will not clean up what you need, but leave what you need to remove. Since the utility’s settings are quite extensive and it has many additional useful functions, I decided to talk about it separately in the next article.
13. Links
Hard drive A-Data Ultimate SU650 240GB
Hard drive Transcend StoreJet 25M3 1 TB
Hard drive Western Digital Caviar Blue WD10EZEX 1 TB